Astro-Physics Tools is a NINA plugin that implements multiple Advanced Sequencer instructions that are useful for users of Astro-Physics mounts and APCC Pro.
Introduction
Astro-Physics Tools is a plugin for NINA 2.0. It provides instructions that enable direct interaction with Astro-Physics’ APCC Pro and APPM applications. This interaction is currently limited to creating all-sky and declination arc models directly from within NINA 2.0’s Advanced Sequencer, but addtional functionality is planned.
Requirements and installation
- NINA 2.x, or 3.x and later with the SGP Server Emulation plugin installed
- APCC Pro 1.9.2.5 or later
- Your APPC Pro license enables the NINA Camera Support and Dec Arc Tracking features
- An Astro-Physics GTO mount!
Your APCC Pro license
Beginning with APCC Pro 1.9, Astro-Physics has transitioned to an incremental update license where major new features are enabled by purchasing an updated license from Astro-Physics. APCC Pro’s NINA Camera Support and Dec Arc Tracking features fall under this category of new functionality, so your APCC Pro license must enable them. Please refer to the APCC FAQ on the Astro-Physics website for more information and how to order an upgraded license.
You can verify the status of your license by opening APCC Pro and going to Help > View/Update License Subscription. A license that is suitable for use with Astro-Physics Tools will look like this, with the required features being highlighted:
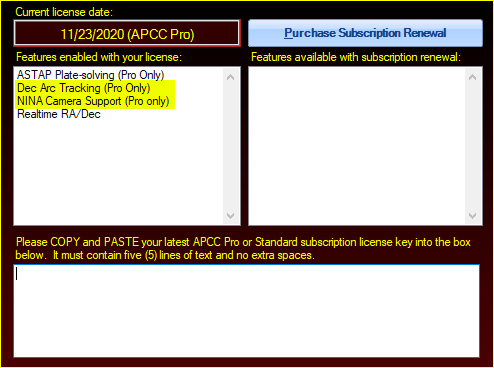
The ASTAP Plate-solving feature is also likely to be required, unless you plan to use a different plate solving application such as TheSkyX or DC3 PinPoint.
Plugin installation
The plugin may be installed by going to NINA’s plugin manager, clicking on Available, selecting Astro-Physics Tools, and pressing the Install button. The plugin’s components will be available for use inside NINA’s Advanced Sequencer under the Astro-Physics Tools category after restarting NINA:

General Configuration
NINA options
In order for APPM to be able to use your camera via NINA, NINA implements a subset of the SGPro API, an API that APPM can use. In NINA 2.x, this API service was built into the core application. With NINA 3.0, this functionality has been removed from the core app and put into a separate plugin named SGP Server Emulation. Instructions for enabling this service under both 2.x and 3.x are below.
NINA 2.x
Enable Server must be turned On in under Options > General > Advanced. Activating this option turns on the API service in that allows APPM to use NINA as a camera.
NINA 3.0 and later
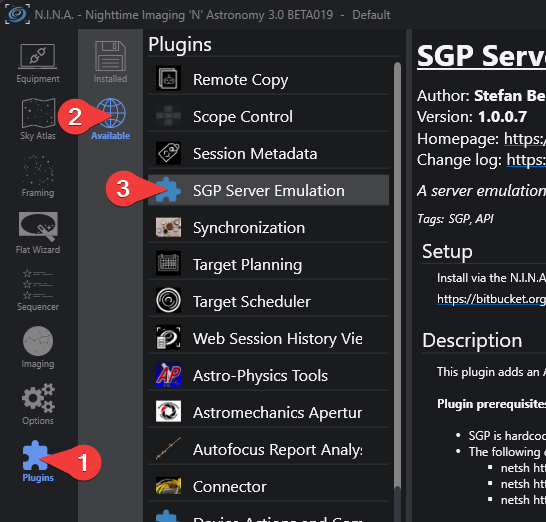
The SGP Server Emulation plugin must be installed. To do this, navigate to the Plugins tab, Available sub-tab, and select the SGP Server Emulation plugin. Click the Install button in the upper right and restart NINA when it has completed installation. The SGPro API service will be available when NINA next starts up.
Plugin options
The Astro-Physics Tools options area can be reached by navigating the Plugins > Installed > Astro-Physics Tools tabs and looking towards the bottom of the screen.
General settings
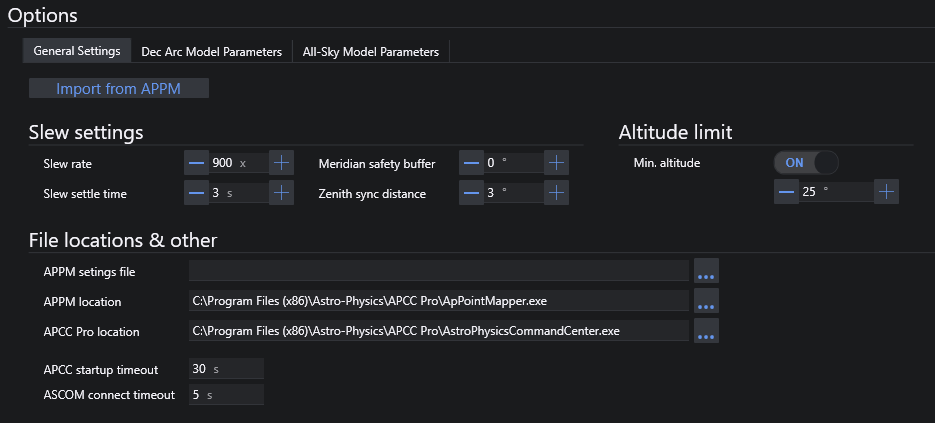
This tab contains common settings that apply to all instructions in the plugin. The Slew settings and Altitude limit areas are related to the settings of the same name in APPM’s Measurement Points tab. The Meridian safety buffer setting is the same as the Safety (degs) setting in APPM, with what I think is a slightly clearer name for its function.
The Import from APPM button offers a quick way to copy in the settings you have defined in APPM’s Measurement Points tab. This is especially handy when using the Create All-Sky Model instruction and its usefulness will be covered in more detail in that section, below. APPM must be running for this button to work.
Under File locations & other, the defaults will be fine under the majority of circumstances. Alternate locations of APPM and APCC Pro maybe specified if needed. The only time the timeout-related values should be adjusted is if one has a very slow computer and it takes a while for APCC to start.
The only setting that may be of interest here is APPM settings file, which is a file of settings that are, for the most part, relevant to APPM’s Run tab. You may save those settings in APPM (File > Save Settings File As…) and then specify that file here if you wish APPM to always run with those settings.
The Dec Arc Model Parameters and All-Sky Model Parameters tabs pertain to the Create Dec Arc Model and Create All-Sky Model instructions, respectively, and these settings will be explained in detail in the section for those instructions.
APCC Pro configuration
There are a few settings in APCC Pro that must be made or considered.
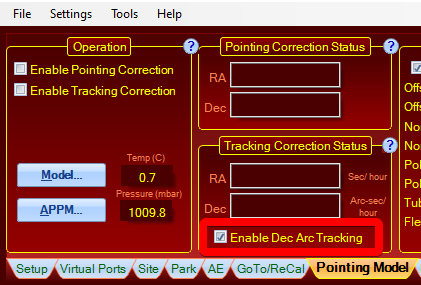
- Under the Pointing Model tab, ensure that Enable Dec Arc Tracking is On
- It is STRONGLY recommended to utilize horizon limits. Horizon limits help to constrain your models to only the visible sections of the sky. This is especially useful if your local horizon has tall obstacles (trees, buildings, etc.) that obscure otherwise usable parts of the sky. A tool to aid in producing a horizon definition file that is usable in APCC Pro, NINA, Stellarium, and other apps is Ryan Kinnett’s GyroCam tool, made just for this purpose.
APPM configuration
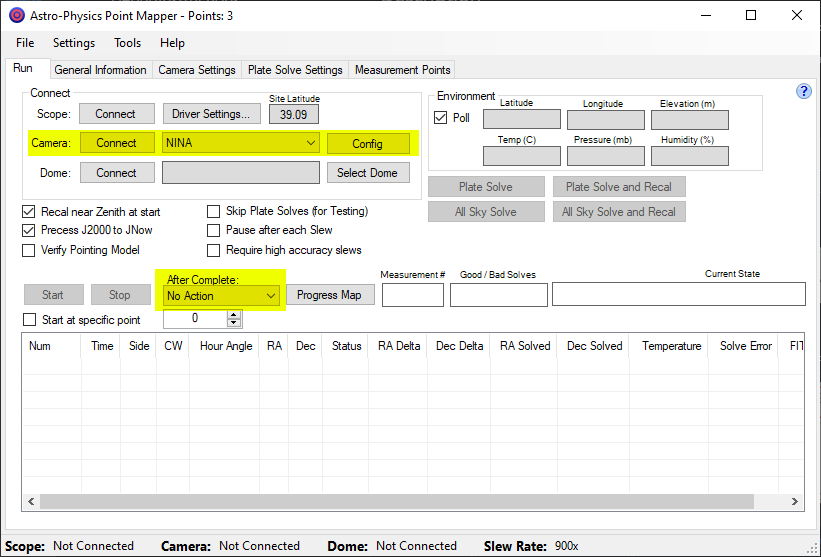
The following settings are required on APPM’s Run tab:
- Camera should be set to NINA
- After Complete should be set to No Action
The After Complete option is best set to No Action if you intend to start imaging a target immediately upon finishing any modeling run. Whatever you set this to will have to be considered in the context of where you place it in your sequence. For example, setting it to Park will require that you place an Unpark sequence instruction after the modeling instruction before doing anything else.
Additional settings may be considered and you may read about these in chapter 15.3 of the APCC Pro manual.
A note about APPM and plate solving
Although Astro-Physics Tools does not care about which plate solver you configure for use in APPM, the topic is worth mentioning for those who may be setting up APPM for the first time, or are using APPM for the first time in conjunction with NINA.
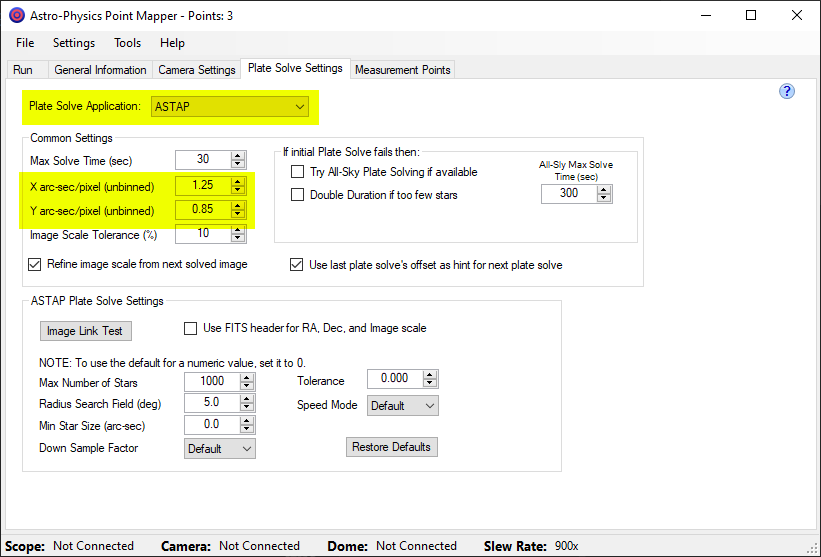
As a general rule, NINA’s plate solver of preference is ASTAP. The APPM that is included with APCC Pro 1.9.x also supports ASTAP for its plate solving needs. So, in the context of using APPM and NINA via this plugin, It’s recommended that you configure APPM to also use ASTAP. The same installation of ASTAP should be used in both NINA and APPM.
Be sure to review the ASTAP settings on APPM’s Plate Solve Settings tab. The critical settings to pay attention to are the X and Y axis arc-sec/pixel (unbinned) settings. Your imaging system’s X and Y axis pixel scale should be entered here.
Future versions of NINA may include an API endpoint to handle plate solving completely in NINA which would obviate these instructions.
Sequence Instructions
Below are descriptions of each instruction that Astro-Pysics Tools provides in the Advanced Sequencer. Generally, there are two realms of configuration: the instruction’s primary settings, which are set under the relevant tab in the plugin’s main options area, and runtime options which may be set within the sequence.
Create Dec Arc Model

Create Dec Arc Model takes advantage of APCC Pro 1.9’s new Declination Arc modeling feature. Dec arc modeling allows you to create a model that’s focused on just the section of sky you will be imaging, such as the arc that your target will traverse. Because this will be a smaller area compared to that of the entire sky, you can create a more detailed model than you might otherwise with an all-sky model. Declination arc models may be preferable over an all-sky model if you image occasionally or will be imaging a single target over several nights. It can afford a degree of time economy depending on your activity pattern.
The Create Dec Arc Model instruction can be inserted inside any Deep Sky Object container in NINA’s Advanced Sequencer. When the sequencer reaches it, the instruction will look up the target’s RA and declination and program the declination arc modeling parameters into APPM based on the instruction’s model creation parameters.
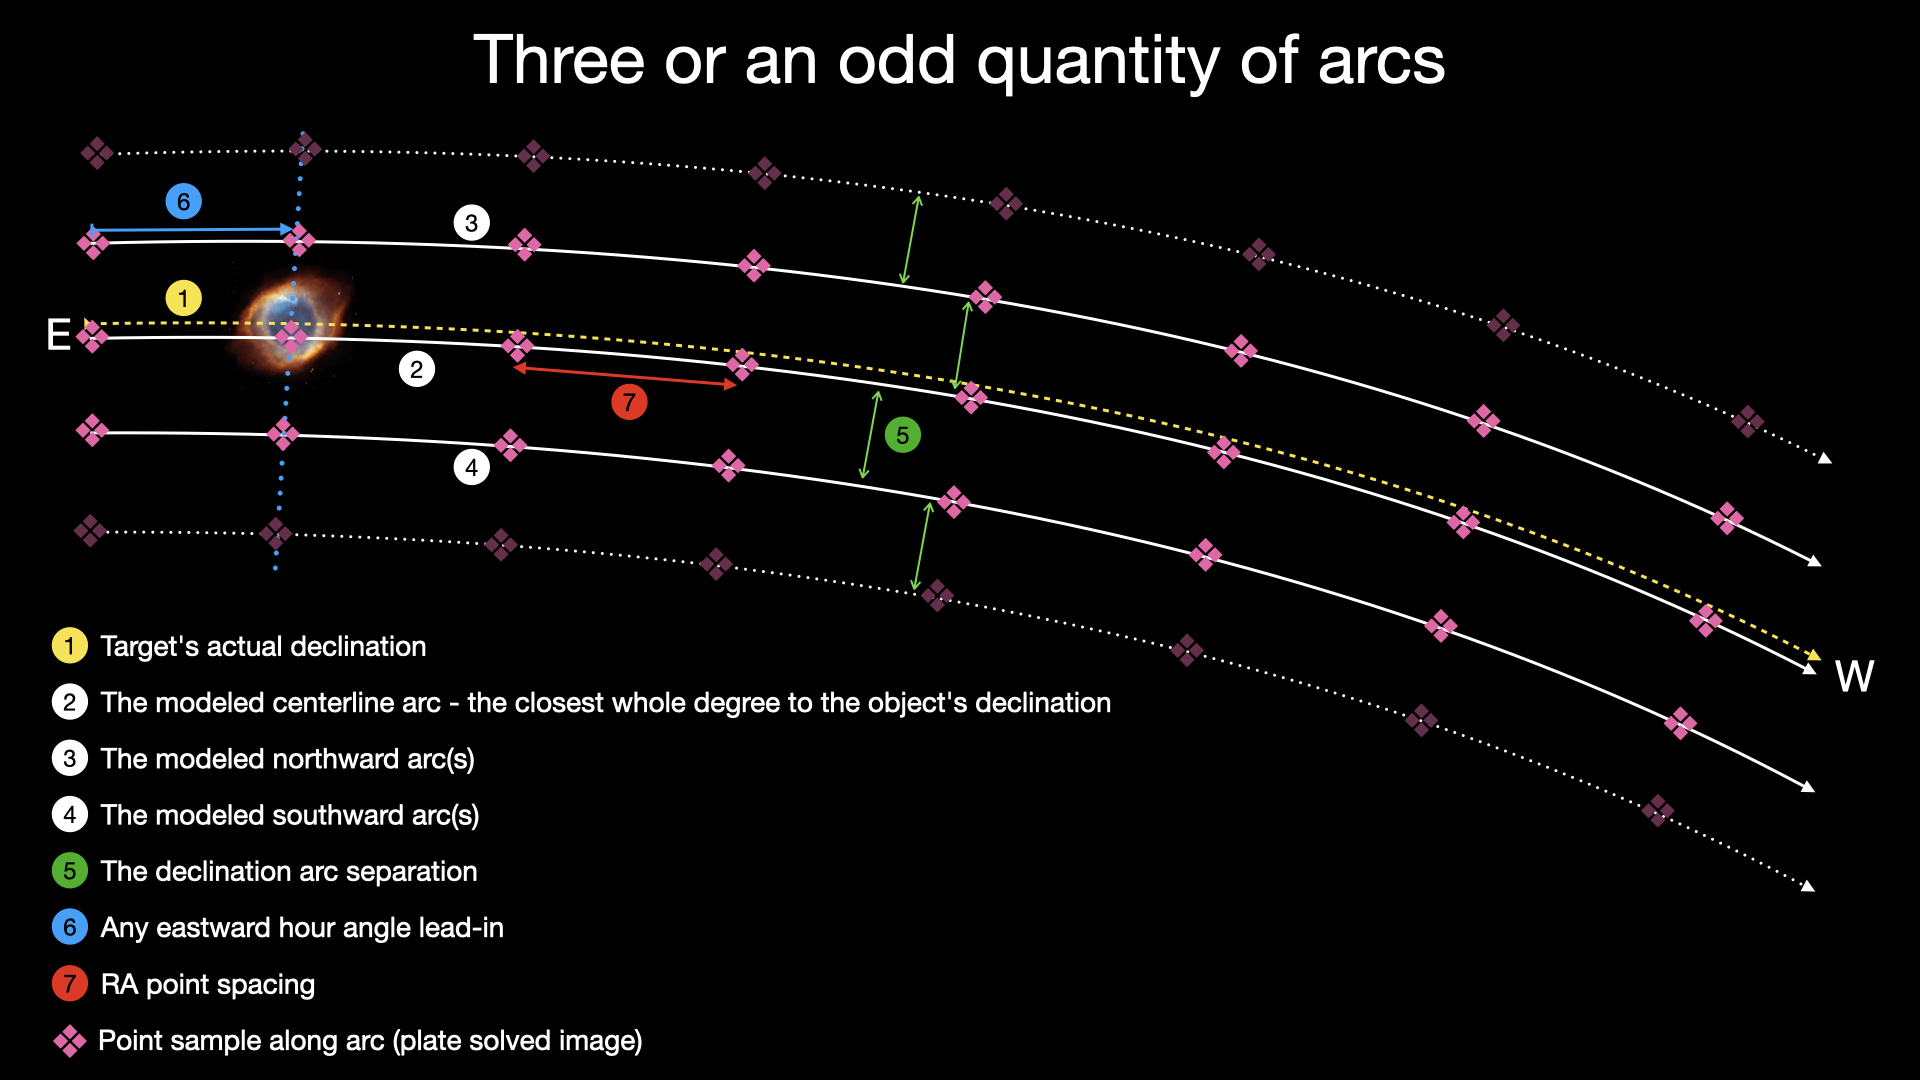
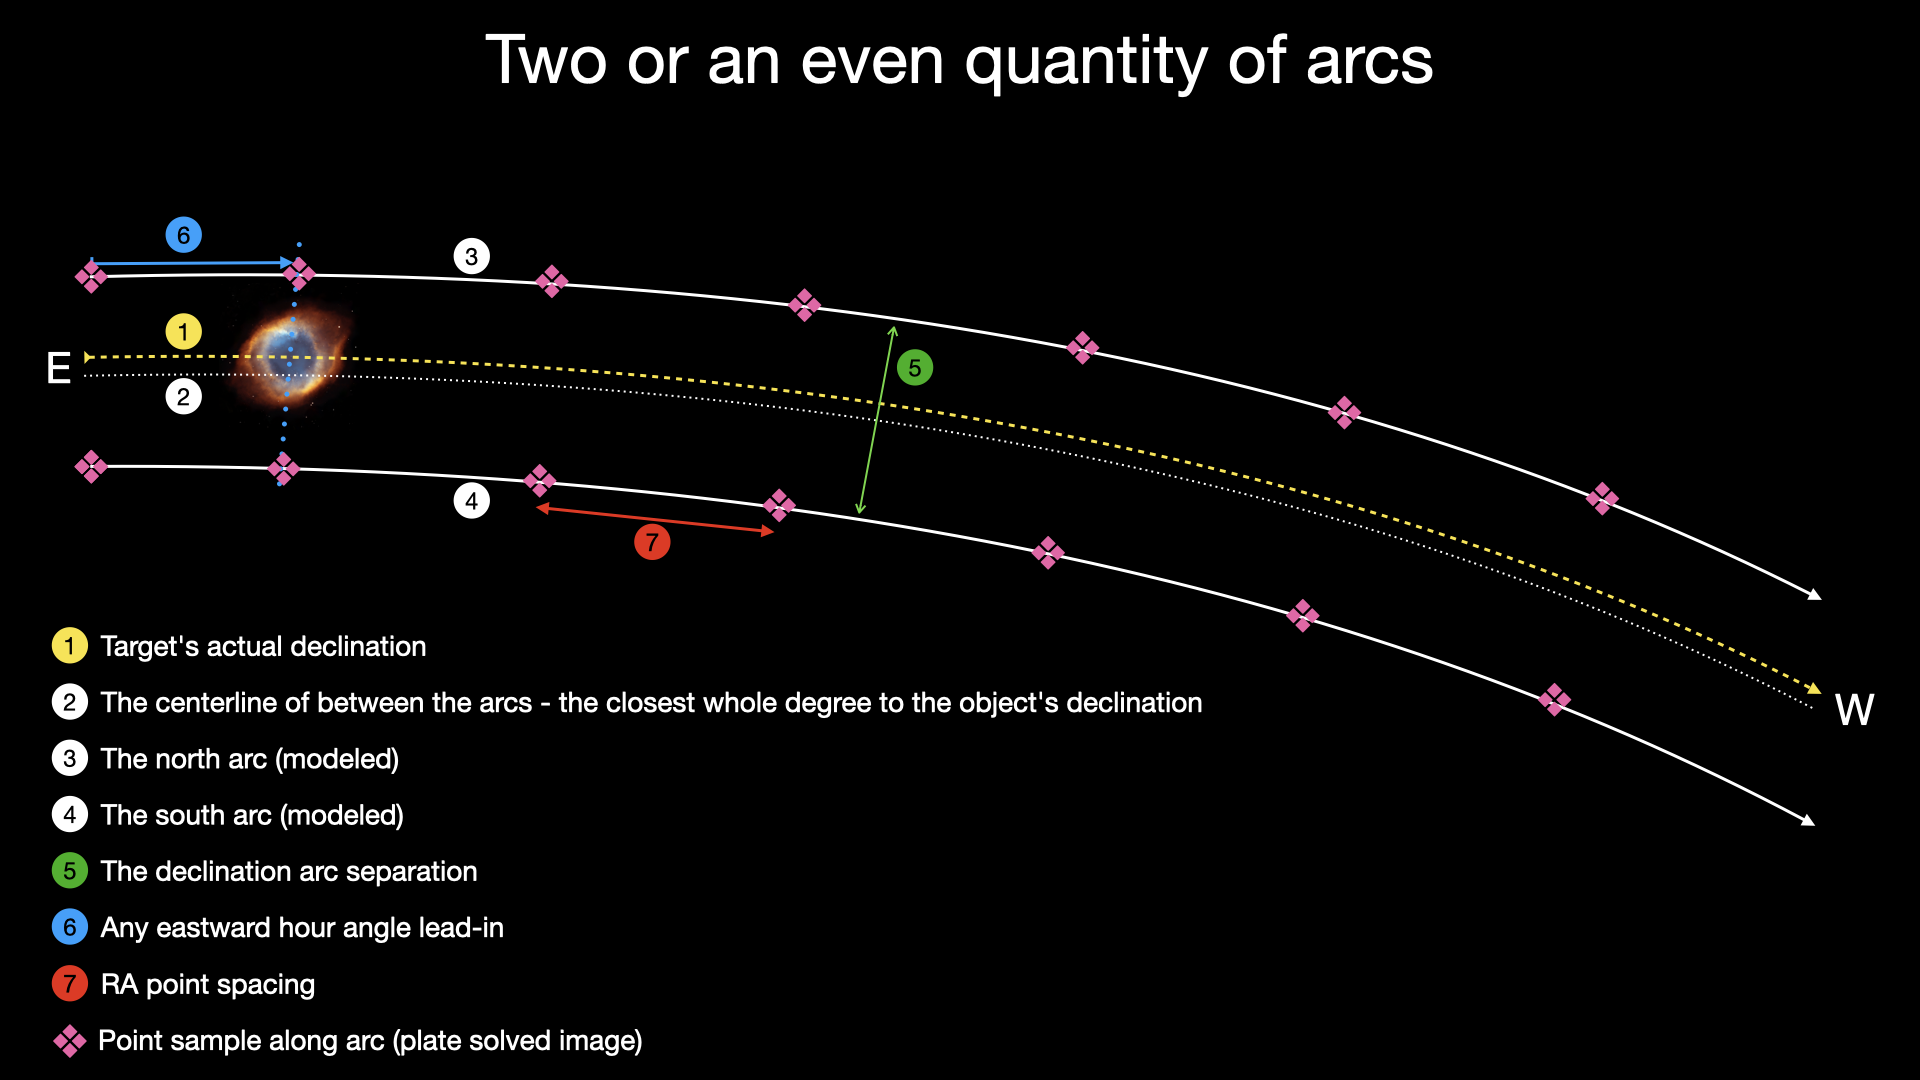
To help visualize what a declination arc model looks like, refer to the following two diagrams that depict two different modeling scenarios.
Model creation parameters
You will find the parameters that the instruction will use to create the dec arc model in the Astro-Physics Tools plugin options area. You can reach this area by navigating the Plugins > Installed > Astro-Physics Tools tabs. Select the Dec Arc Model Parameters tab to show the model creation settings:
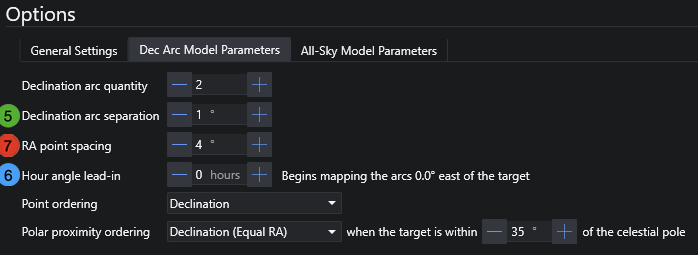
- Declination arc quantity – Sets the number of declination arcs, with the center-most arc being closest to the target being imaged. In the case of 2 arcs, the target will be enclosed between both arcs. With 3 arcs, the center arc is closest to the target with 1 arc on either side, and so-on.
- Declination arc spacing – Sets the amount of north-south separation between each arc. Typical values are 1 to 5 degrees. How much spacing is appropriate is a judgement call based on your imaging system’s field of view. A small FoV will benefit from a smaller separation between the arcs. A wide field or wide FoV will benefit from a wider separation.
- RA point spacing – This sets the distance between mapping points in the right ascension axis. A smaller spacing between points will result in more points to map along each arc, so this setting directly influences how many mapping points will be done, and thus how long the model will take to complete. General advice for spacing is the same as that for the Declination Arc Spacing setting.
- Hour angle lead-in – The instruction will start modeling the declination arcs at the target’s current position in the sky. If you wish to begin modeling the arc farther east of the target’s position, the Hour angle lead-in setting can be incremented to do so.
- Point ordering – This setting mirrors the setting on the Measurement tab in APPM. Refer to chapter 15.7 of the APCC Pro user manual for a full description of these options. Dome users may wish to take particular notice of the Hour Angle mode of ordering.
- Polar proximity ordering – When creating models that are closer to the celestial pole, the number of mapping points in the right ascension axis will increase as the angular definition of a degree shortens. This can lead to a inordinate amount of mapping points to model; more so than is warranted. This option allows a different point ordering strategy to be used when the target is within the specified distance of the celestial pole. For example, dome users may wish to use the Hour Angle mode for normal point ordering, but switch to a different strategy near the poles.
Runtime settings
- Do full arcs – Create Dec Arc Model will normally start modeling the target’s declination arcs at its current location in the sky, on the right ascension axis. Setting Do full arcs to On will make APPM model the arcs from the east to west horizons, or to the limits as set in APPM, via either horizon limits or the Minimum Altitude setting in APPM’s Measurement tab.
- Manual mode – The instruction will start APPM and program in the model settings but will not start the model run. This will allow you to review the model before starting the modeling run. Note that you will also have to manually connect the camera, mount, and any dome devices in APPM when this setting is used.
- Keep APPM open – The instruction will not make APPM exit at the conclusion of the model run.
Workflow examples
Because this instruction works off of a target’s defined coordinates in order to model declination arcs, Create Dec Arc Model must be placed somewhere inside a Deep Sky Object or similar container, such as the one provided by Nick Hardy’s ExoPlanets plugin. A validation error will be raised when the sequence is started without it being placed appropriately.
Given the purpose of a declination arc model, the instruction should be one of the first operations when starting on a target. A typical Advanced Sequencer sequence might start off like so:
- Wait for a certain time, target altitude, etc.
- Unpark telescope
- Center target and rotate
- Begin imaging loop
Adding in Create Dec Arc Model would alter that opening workflow like so:
- Wait for a certain time, target altitude, etc.
- Unpark telescope
- Create Dec Arc Model
- Center target and rotate
- Begin imaging loop
An additional thing to consider is any need to do an autofocus prior to starting the model run, especially when the context is the first target of the evening. You might wish to slew the telescope to a high altitude at a preferred azimuth to do an explicit autofocus first:
- Wait for a certain time, target altitude, etc.
- Unpark telescope
- Slew to Alt/Az
- Autofocus
- Create Dec Arc Model
- Center target and rotate
- Begin imaging loop
If your OTA’s optics are quite stable or has a deep CFZ, then you might wish to forego the initial autofocus and instead move your focuser to a known position that is “good enough” for the configured plate solver in APPM to work. As we know, there are varying tolerances to out-of-focus stars across all the flavors of plate solvers, but none of them require that the images they are asked to solve have pinpoint stars in order to work. This is, of course, a judgment call on your part as you are the person who is most familiar with your configuration’s tolerances and what constitutes “good enough.”
Regarding filters, the Create Dec Arc Model instruction will switch any connected filter wheel to the configured plate solving filter in NINA’s plate solving configuration, found by going to Options > Plate Solving in the main NINA app. The previous filter will be reinstated at the end of the modeling run.
Guiding, if it happens to be active at the time of model creation, will also be suspended and restarted upon model creation.
Create All-Sky Model

Create All-Sky Model is a sequence instruction that does as it is named – it starts APPM and proceeds to run an all-sky point mapping run using the settings defined under the All-Sky Model Parameters tab in the plugin’s Options area. Upon completion of its mapping run, APPM will load the model into APCC Pro and then exit. The sequence will then continue normally with a fresh pointing and tracking model in APCC.
Model creation parameters
You will find the parameters that the instruction will use to create the dec arc model in the Astro-Physics Tools plugin options area. You can reach this area by navigating the Plugins > Installed > Astro-Physics Tools tabs. Select the All-Sky Model Parameters tab to show the model creation settings:
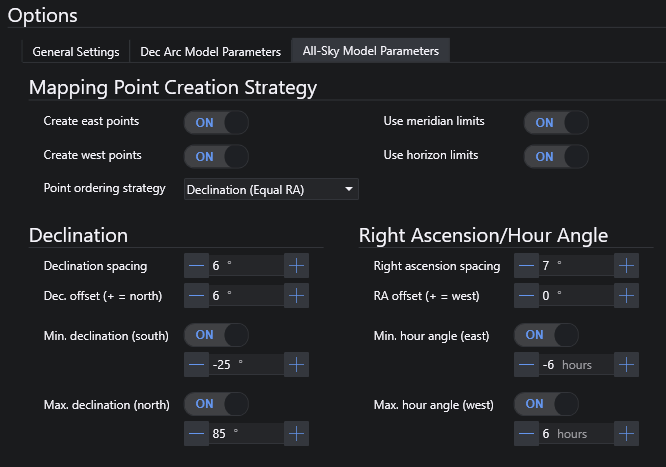
The layout and options here mirror those of the Measurement Points tab in APPM. They take the same parameters and have the same definition in terms of function. These parameters are explained in detail in chapter 15.7 of the APCC Pro manual.
When setting these up, I strongly suggest configuring your desired all-sky model parameters in APPM itself, where you can use its Show Points window to visualize what you are configuring. APPM will also give you a time estimate which is very useful. Once you arrive at your desired configuration, you can go to the General Settings tab in the plugin’s Options area and press the Import from APPM button. This will pull in the settings you’ve configured in APPM and save them in the plugin’s own configuration. These will then be the settings that are used when a model run is started.
Runtime settings
- HA tail – By default, the western end of the declination arc will be either sunrise or the horizon, whichever point would be reached first. If the western end of the arc does not reach the horizon, that is because that location is where the target will be when the sun rises. If you wish to extend the modeled arc beyond that point, you may add a “tail” with 0.1 hour granularity to extend the western hour angle limit further.
- Do full arcs – Activating this option will model the entire declination arc of the target, regardless of target imaging start time or target set time
- Manual mode – The instruction will start APPM and program in the model settings but will not start the model run. This will allow you to review the model before starting the modeling run. Note that you will also have to manually connect the camera, mount, and any dome devices in APPM when this setting is used.
- Keep APPM open – The instruction will not make APPM exit at the conclusion of the model run.
Workflow examples
Unlike creating dec arc models, Create All-Sky Model does not do its job in the context of a specific target. The general idea is to create an all-sky model at the earliest opportunity in the night, with model created during the late dusk time period being common – it’s still too bright to image a target, but dark enough that stars may be resolved in images and successfully plate solved. Doing it this way will help maximize your on-target imaging time, assuming that you are imaging a target this has sufficiently risen by the time the sky is dark enough to do so.
In that example, you might have your own all-sky model sequence container that is situated immediately after the Startup Sequence area, but prior to any target containers. The theory here is that your startup sequence would turn on and prime your gear for operation and then step to the all-sky model container where it would wait for an appropriate time to start creating an all-sky model:
- <Do Startup Sequence>
- Wait for nautical or astronomical twilight
- Unpark telescope
- Slew to high Alt/Az
- Switch to Luminance filter
- Autofocus
- Create All-Sky Model
- Commence with operations here
The same advice about the need to autofocus also applies here, but more judgment could be considered. All-Sky models can take far more time to create than declination arc models; enough time that the cooling evening air might cause your focus to shift at a greater rate than it would later in the night and perhaps eventually shift to such a degree that plate solves begin to fail. It might be required that you do an actual autofocus run at the start of a run to be more in-focus. Again, this is a judgment that should be based on your experience with your own gear. A future version of this plugin may include the ability to pause a model run to do an autofocus before resuming.
As with the Create Dec Arc Model instruction, Create All-Sky Model will switch any connected filter wheel to the configured plate solving filter in NINA’s plate solving configuration, found by going to Options > Plate Solving in the main NINA app. The previous filter will be reinstated at the end of the modeling run.
Guiding, if it happens to be active at the time of model creation, will also be suspended and restarted upon model creation.
Astro-Physics Park

This instruction can be used to send an Astro-Physics mount to any one of the five defined park positions regardless of which park position is configured as the default in the A-P ASCOM driver or in APCC. The different park positions are explained in this Astro-Physics support document.
Start APCC

Start APCC is a seemingly simple instruction that does some moderately complex stuff behind the scenes. As its name implies, it starts APCC, but also goes beyond that. The full action of this instruction is to start APCC and connect N.I.N.A. to the Astro-Physics ASCOM driver in one fully automatic action. The steps it executes are as follows:
- It starts APCC
- It waits for APCC to launch the Astro-Physics ASCOM driver
- It then connects N.I.N.A. to the Astro-Physics ASCOM driver
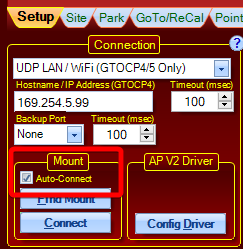
There are some configuration requirements in APCC for this to be successful. The Mount box in APCC’s Setup table has an Auto-Connect option that must be selected.
This instruction is not critical for using any of the other instructions included in Astro-Physics Tools. It is present in the event that a particular workflow finds a need for it.
Getting Support
Support for this plugin can be found in the #plugin-discussions channel on NINA’s Discord server. You can also find me on the ap-gto Groups.io forum/mailing list.
thanks for your work on this – I updated ASCOM, APCC, and your plug in.
When I run it or look at APPM – I don’t see NINA in the options.
When I run it – It says it can’t find SGP for plate solving?
I use ASTAP in NINA for solving? I suspect maybe my old settings file is causing this?
I have installed APCC v1.9.6.3 and I’m running NINA v2.1.1.2005. When I try to load Astro-Physics Tools, I immediately get an Error: Plugin Installation for plugin Astro-Physics Tools failed.
I have no idea why. Any suggestions would be greatly appreciated!
Hi Dale,
Thank-you so much for creating the ability to create Dec-Arc models from NINA, I have used them both with my AP 1100GTO AE and Mach2 mounts to great success – particularly during the summer, when I am most often going after 1 target per night or over a few nights.
One question is, according to NINA, my sequence always marks the activity with an X, indicating that it did not work, although the dec-arc model is clearly put into APPC and is being used. I have no idea why this error occurs.
The second question deals with the 1100GTO mount. After running APPM and uploading the model, the mount becomes completely lost and wont slew to the target location from NINA. My only solution in this case is to park3 the mount, power cycle it to reinitialize. I am not sure if different commands, out of sequence?, are being issued by NINA and APPM/APPC once the mapping is completed – and if this is the source of the error above. Funny, but while I do get the error message, my Mach2 goes ahead flawlessly without my intervention, although I do issue the commant to first park and then immediately unpark the mount just so I know.
I am unclear what state APPM leaves the mount (parked? tracking?), and if NINA is even aware of what state the mount is in, and this might be the source of my errors. Have you heard of this before?
It is only a minor inconvenience over the great ability you have provided to integrate NINA with AP utilities, so a big thanks again from me.
Hi Dale. I have an 1100GTO without encoders. I am beginning the transition into NINA with dec arc modeling. I too have noted (as David Payne says above) that my dec arc model completes but is maked with a red X indicating that the model did not work. The sequence continues and the target is correctly imaged. The active point map does show that the APPM data is used during the imaging. Why the red X?