Introduction
This document is to serve as an explainer/FAQ for using N.I.N.A. with an Astro-Physics mount. While there is nothing specific to N.I.N.A. that one must set in the Astro-Physics ASCOM driver, APCC, or the mount’s Control Panel settings, there are a number of helpful configuration tips and capabilities within N.I.N.A. that will allow you to take full advantage of your Astro-Physics mount when used in conjunction with APCC (Astro-Physics Command Center) Standard or Pro.
This document assumes that the reader is using the following software:
- N.I.N.A. 3.0 or later
- APCC Pro 1.9.5 or later
- The current version of the Astro-Physics ASCOM driver
A-P mounts with a connected keypad
This section is not relevant to those who operate their Astro-Physics mount without the keypad. If you do operate your mount with the keypad connected, even if you do not regularly use it, you should consider the advice in this section.
The first thing to consider when setting up your Astro-Physics mount for imaging is which auto-connect mode to keep the keypad in. The keypad can be conceptualized as just another “client” to the mount, little different than computer(s) connected via the serial, USB, or ethernet/Wifi. When the mount powers on, it does so into an uninitialized state. The CP on the mount does not yet know its location or time and must be told that before the mount is considered to be initialized and ready for operation. By default and if it is connected, the keypad will do this automatically. It will program the CP with its notion of time and, when selected from the location menu, the latitude and longitude. The CP cannot be reinitialized unless it is first powered off.
This automatic initialization by the keypad can create some confusing situations if you also have an imaging PC with the A-P ASCOM driver and, optionally, APCC running on it and connected to the CP as well. Because the keypad is directly connected to the CP and initializes the mount upon power-on, the keypad will always win the race to initialize the mount, which may be with time that is not correct or what you intend. When you subsequently connect with the A-P ASCOM driver/APCC, the mount will already be in an initialized state and cannot have any errant time or location changed.
To avoid this and allow the A-P ASCOM driver/APCC be the one to initialize the mount, but still have the keypad connected for manual use, you must change a configuration parameter on the keypad. The keypad’s AutoConnect setting must be changed to EXT (EXTernal) rather than the default of On. This will prevent the keypad from initializing the mount immediately upon power-on and allow you to do that via the A-P ASCOM driver/APCC afterwards. If you are not imaging and wish to control the mount exclusively via the keypad, the keypad will still be able to initialize the mount but only after you manually select a location from its menu. Refer to page 13 of the Keypad Manual at the Astro-Physics Support site on how to set the AutoConnect setting. This advice applies equally to the CP3, 4, and 5.
General NINA settings
Inside NINA itself, there’s really only one setting that you should be mindful of when using it with Astro-Physics mounts, and this is the Use Telescope Side Of Pier setting, found under Options > Imaging. This should always be set to On.
The other meridian flip settings under that same category are relevant only if you’re not using the Smart Meridian Flip plugin in your sequences (see Meridian Limits below). If you do not use that plugin, the general advice for what to enter into those can be reviewed in NINA’s online documentation on the topic.
Another area to mind is the latitude and longitude that can be configured under Options > Astrometry. My suggestion here is to set both of these to 0 and maintain your site’s lat/long in the APCC Mount Initialization settings. When NINA next connects to the mount, it will note the large discrepancy between its settings for lat/long and the mount’s settings and produce a window asking you how you wish to resolve this difference. You would then choose “Telescope to NINA” so that NINA then sets its latitude and longitude to the same value that you’ve set in APCC. You should not encounter that question again after doing this.
Location source
When you connect to the A-P ASCOM driver in NINA, you may be presented with a with a window that asks you which source of truth you would like to use for your location information. This window is presented if the ASCOM driver reports location information that is sufficiently different than what NINA’s own location settings are. If you are presented with this while using the Astro-Physics ASCOM driver, always choose “Telescope to NINA” as the answer. This will take the location information you initialized the mount with and overwrite the contents of the latitude, longitude, and elevation in NINA’s Astrometry settings with it, located at Options > General.
Because of the way the ASCOM interface for mount drivers works, being able to set location information in the mount is optional for mount ASCOM drivers to support. Due to how A-P mounts are initialized by its ASCOM driver, APCC, or keypad (see above), once initialized there is no ability to change the CP’s programmed site/location until a power-cycle of the CP is done and the CP is re-initialized with different Site settings from the ASCOM driver, APCC, or keypad. As a rule, you should always keep your location database in the A-P ASCOM driver, APCC, or the keypad (whichever one you use to initialize the mount with) updated with your site latitude and longitude, and be sure to select the intended one when initializing the mount.
NINA 3.0 adds a new Mount section to the Options > Equipment window. The new options in this area permit automatic syncing of the site information to NINA, which means you will avoid seeing the location sync window when NINA is connected to the mount’s ASCOM driver. For Astro-Physics setups, with or without a sky model, I recommend the following:
- Mount name: As desired
- Settle time: As desired
- Location sync: Sync to application
- Coordinates sync: On
- Time sync: On
Horizon limits
APCC allows you to set horizon limits for the mount. This prevents the mount from tracking below your local horizon where your view may be blocked by trees, houses, or other obstacles. APCC stores these horizon limits in a text file with a .hrz file extension. The format of the file is quite simple, with two columns of numbers:
# Astro-Physics GTO Horizon File v1.0
# Points 360/
# Az Alt
0 36.8
1 35
2 35.4
3 33
...
...
359 28.3
As you can see, the first column is the true north azimuth in integer degrees and the second column is the angular altitude of sky obstructions at that azimuth. The altitude can be specified in either integer or decimal numbers. You are able to specify an altitude for each of the 360 degrees of azimuth around your mount, from 0 to 359 degrees. Altitudes do not need to be defined for every degree between 0 and 359. You can have gaps in azimuth where the last-defined altitude value is used for any subsequent missing azimuth degrees. This is helpful if you have a dome or large views of the sky that have the same altitude limit.
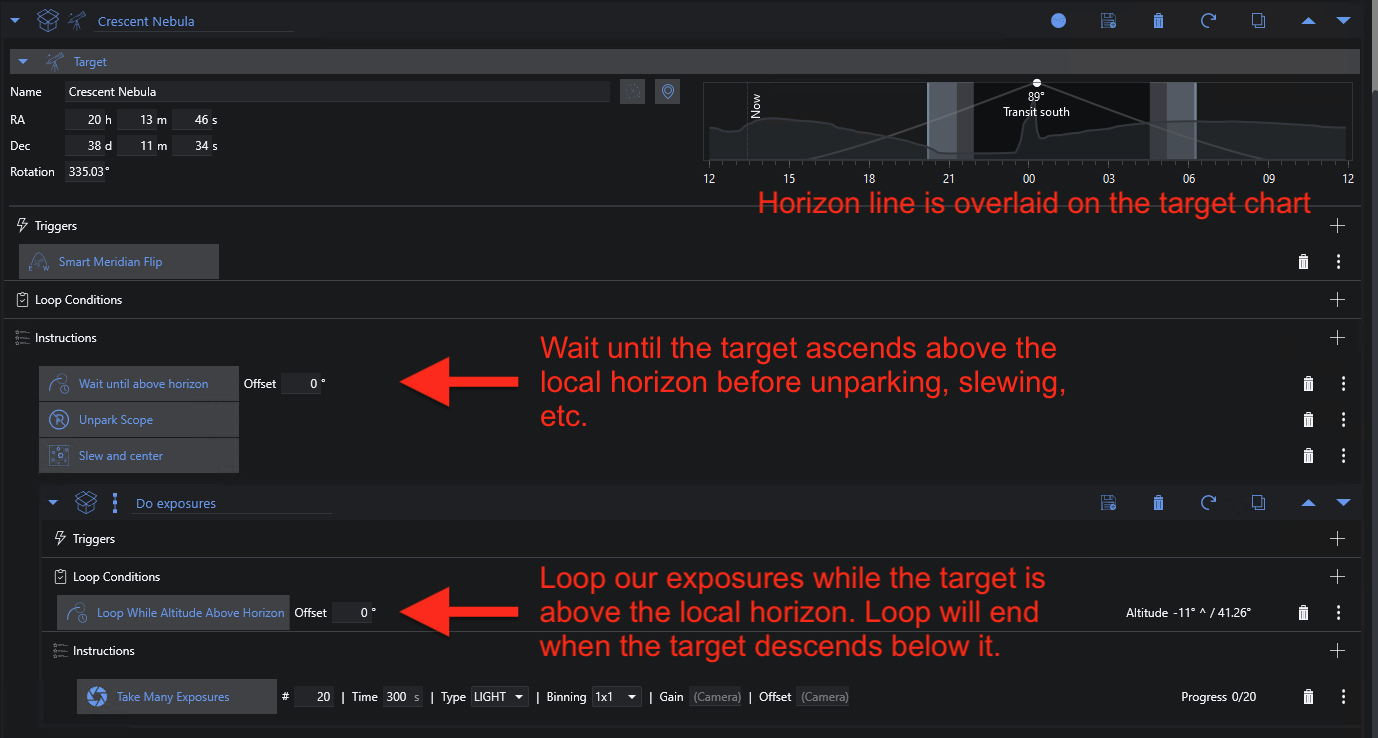
This same file can be used by N.I.N.A. to inform it of your local horizon. When configured with the location of the horizon limits file, N.I.N.A. will overlay the horizon on target information charts. You will also be able to use the horizon-related triggers in Advanced Sequencer. Doing so will allow you to start and end imaging when the target is truly visible. This solves the problem of ending up with a bunch of images of trees or the side of your house because your sequence started too early or ended too late. Configuring N.I.N.A. is simple:
- In N.I.N.A., specify the path to the
.hrzhorizon limits file under Options > General > Astrometry. - In Advanced Sequencer, you can now use the the following two items:
- Loop While Altitude Above Horizon – a loop condidtion that will keep a looping instruction set running while the target is above your defined horizon line. This is found in the Loop Condition category of instructions.
- Wait Until Above Horizon – An instruction that will pause the sequence until the defined target is above the defined horizon line. Found in the Utilities category.
You would use both of the above instructions together. Wait Until Above Horizon is used to prevent your sequence from starting until the target is above the defined horizon line. Loop While Above Horizon is used to loop the instruction set until the target sets if a different loop condition doesn’t end the loop before it does.
Meridian limits
Meridian limits are a sort of complex topic. Realizing their benefit requires you to be well-aware of how mounts, especially equatorial mounts, work as well as the limitations around how they move when considering the physical dimensions of the telescope(s) they carry. Meridian limits are intended to prevent the telescope, usually the rear and western side of it, from tracking too far and crashing into the pier or tripod legs. They can also serve to define areas around the mount where the telescope can continue tracking past the meridian in a counterweight-up orientation for some amount of time without crashing.
APCC allows one to define meridian limits for their mount+telescope configuration using its built-in tool. Please refer to APCC’s documentation on meridian limits. Ray Gralak also has a video on this topic. When a meridian limit is defined in APCC, it is saved in a .mlm meridian limits definition file. The location of this file is usually in the C:\ProgramData\Astro-Physics\APCC\ folder.
Taking advantage of APCC’s meridian limits in N.I.N.A. requires the use of Francesco Meschia’s Smart Meridian Flip plugin for N.I.N.A. 1.11. The following steps should get it working:
- In N.I.N.A. 1.11, go to Plugins > Available and install Smart Meridian Flip. Restart N.I.N.A. to activate it.
- Go to Plugins > Installed, select Smart Meridian Flip, and specify the location of your APCC meridian limits (
.mlm) file - In Advanced Sequencer, replace any instance of the stock N.I.N.A. Meridian Flip trigger in your templates with Smart Meridian Flip. The trigger will be found under the Telescope category of instructions.
- You’re done!
Smart Meridian Flip will pause or flip the mount, whichever is appropriate, up to 10 seconds prior to reaching the limit. This is so that the limit is not actually reached and APCC reacts by stopping tracking or parking the mount, which can mean an end to your session. A flip can happen early if you are doing 5-minute exposures and there is only 4 minutes of time before the limit minus 10 seconds is reached.
Below is a short video that demonstrates how this works.
Point mapping
Compared to APCC Standard, APCC Pro adds point and tracking modeling via its APPM (Astro-Physics Point Mapper) facility. This has many benefits for guiding during imaging and is certainly required if you intend to do long exposures without guiding. The premise is that there are many factors that affect how our telescopes perform, from mechanical to atmospheric, and mount tracking and pointing can be further improved if these various factors can be found and compensated for.
APPM builds a model by pointing the telescope at many points around the sky and plate solving each point. It then compares what it thinks the RA and declination are to the RA and declination that the plate solver reports. Any differences are noted and accounted for, which allows APPM to build a model. The more points that are taken, the more detailed the model is.
How often this modeling should be done will vary with your type of setup and the local conditions. A model can be used for some time – weeks or even months – if you are operating from a permanent observatory. Mobile imagers will want to build a new model in the places they set up. Some people prefer to make new models often, ranging from once a week to nightly. How often really depends on the situation.
To assist with model creation for N.I.N.A. users, I have created the Astro-Physics Tools plugin for Advanced Sequencer that works with APCC Pro 1.9. It implements a sequence instruction that you can use to automatically run an APPM mapping session directly as a part of your sequence, such as at the beginning of the night. Please head over to its page for instructions on how to use it.
Can you advise how to get the Park function to properly Park at my APMach1 APCC set point using NINA?
I must have some setting not properly set.
I upgraded to 2.0 beta since I was not able to find how to enable the server on 1.10HF3 so I could run APPM. ON 2.0 I can enable server, but now I get the following error it says that 59590 is registered to another url.
This appears to be a fantastic utility, and I thank-you very much for creating it.
I haven’t got it to actually work for me, however. Every single plate solve fails when I invoke APPM from NINA using ASTAP. ASTAP doesn’t even try, it simply instantly displays a “Fail” and moves onto the next point. ASTAP works fine within Nina, and from APPM will plate solve.
I am sure it is a setting I have, but I really don’t know what? I am suspecting that ASTAP from ATTP isn’t getting the image scale for some reason. Any suggestions?
THanks,
Dave
This is likely from the arcsec/pixel or OTA focal length not being set somewhere.
Thanks Eric.
Now I am in business. The utility is humming now on both an 1100GTO and a Mach2. Thanks for the help. The SGP API emulator also helps.
Of course, getting greedy here, but does the SGP API emulator also allow Astro-physics mount slews within either East or West meridian limits in NINA, as it does with SGP?
Cheers,
Dave
Did you answer Dave. I have the same problem. Using Scopedome 3 also.
This appears to be a fantastic utility, and I thank-you very much for creating it.
I haven�t got it to actually work for me, however. Every single plate solve fails when I invoke APPM from NINA using ASTAP. ASTAP doesn�t even try, it simply instantly displays a �Fail� and moves onto the next point. ASTAP works fine within Nina, and from APPM will plate solve.
I am sure it is a setting I have, but I really don�t know what? I am suspecting that ASTAP from ATTP isn�t getting the image scale for some reason. Any suggestions?
THanks,
Dave
Hi Salaam. I can connect with the camera properly with the SGP API plugin (available at least with NINA beta). Set the right port and now APPM can use whatever driver camera driver is selected in NINA. Images will then be plate solved.
Dave
I cannot connect to NINA from APPM, I get an error message that says the camera is not found. I have a QHY600M that is connected in NINA using the native driver and the camera works fine in NINA. Do I need to change to the ASCOM driver?
Thanks,
Khushrow
I had the same problem… install the SGP API plug-in and set the right port number and you should be good.
Dave
i have the same problem but cant see that plugin?
You might be running an older version of 3.0 nightly.
I became a subscriber today. I went to find the smart meridian flip plug-in you had recommended and noted it was no longer available. I’m a new NINA user with an A-P1100GTO-AE mount. I have downloaded the A-P tools plug-in. Since the NINA I running is v 3.2 are there any special tips to getting this to work with the meridian limits I’ve created in APCC-Pro? Thanks.
I can and have already done All Sky Models in NINA. But in the Dec Arc Model settings in NINA I cannot find a setting to create a Model only in the west.
So my question was will the setting in APPM to build only a Model in the west be used by NINA for a Dec Arc Model.
I am using a Prima Luce Eagle6 and was wondering if I could use the GPS onboard the Eagle to send this to the Mach2 mount in NINA? I currently have it set up this way in NINA to send to my Losmandy G11. I visit a couple of other dark sky sites and would find it accurate to use the onboard GPS.