I have been involved in a new opensource project over the past several months called Nighttime Imaging ‘N’ Astronomy (“NINA”). NINA is ground-breaking both in the hobby of amateur astrophotography and personally. An artifact of several historical reasons, the world of computer-controlled astrophotography is dominated by Windows applications. As such, astrophotography apps tend to follow a closed-source, shareware or freemium/commercial-only model. The idea of well-featured apps being opensource or freeware is a relatively recent development in this niche world, as the list of such apps is abysmally small relative to the large variety of payware apps that are available. NINA stands out in this regard in that it is fully-featured, opensource (GNU GPLv3) and, hence, freely available.
On a personal note, this was my very first introduction to programming on Windows and GUI apps in general. Learning Visual Studio, C#, WPF, and the particulars of Windows programming environments was fun and easier than I had expected. My personal interest on this project is implementing and touching-up direct (“native”) camera control integration and UI tweaks where needed.
Core Concept
NINA’s core concept is straight-forward. In the basic sense, NINA is a program where one sets up a session that contains sequences of hardware control actions and exposures. It operates a to-do list done in sequential order: Point the telescope to this part of the sky. Select the luminance filter in the filter wheel. Perform a focus routine. Take N exposures at X gain (or ISO) and Y shutter speed. Tell the filter wheel to rotate to the red filter and take another N exposures, perform a dither… and so-on.
The idea with such a sequencing app is to compose an astrophotography session and have the app drive it from start to finish. This means one may press “Start” on the sequence and go do other things: watch TV, enjoy visual astronomy through another telescope, or even just go to bed knowing that the application will take care of all the hardware manipulation and data collection and collation itself.
NINA is designed to be accommodating to the new astrophotographer as well as seasoned ones. Full observatory automation is not on the roadmap right now as the team wants to focus on developing the basics first. For the vast majority of amateur astrophotographers, however, NINA’s feature set is both powerful and, most importantly, accessible.
It is worth noting what NINA is not. NINA is not an image processing application. The sole purpose of NINA is to operate your astrophotography gear, get you the exposures you desire, and organize that collected data so that you can then import it into image processing software of your choice (such as PixInsight). Image processing is a world unto itself with a plethora of options, methods, and of course opinions.
Primary Features
Here’s a quick synopsis of the features in NINA as of version 1.8.0. The NINA documentation goes over them in detail.
- Integrated control of telescope mount, camera, filter wheel, focuser, and rotator.
- Native support for Atik, Altair, QHYCCD, ToupTek, and ZWO astronomy cameras as well as Canon and Nikon DSLRs. Naturally, non-native cameras are supported via ASCOM if those cameras have an ASCOM driver. Native support for other brands is certainly a possibility provided there is access to hardware in which to develop and test with.
- Auto-Guiding: Integration with PHD2 to display in-app guiding statistics and to effect actions such as dithering.
- Sky Atlas: Lets one search for targets and slew the mount to them, or to then pop into the sequence or framing editors.
- Framing Assistant: once you decide on a target in Sky Atlas, use Framing Assistant to overlay the camera’s FOV and fine-tune the desired position in the frame and camera rotation.
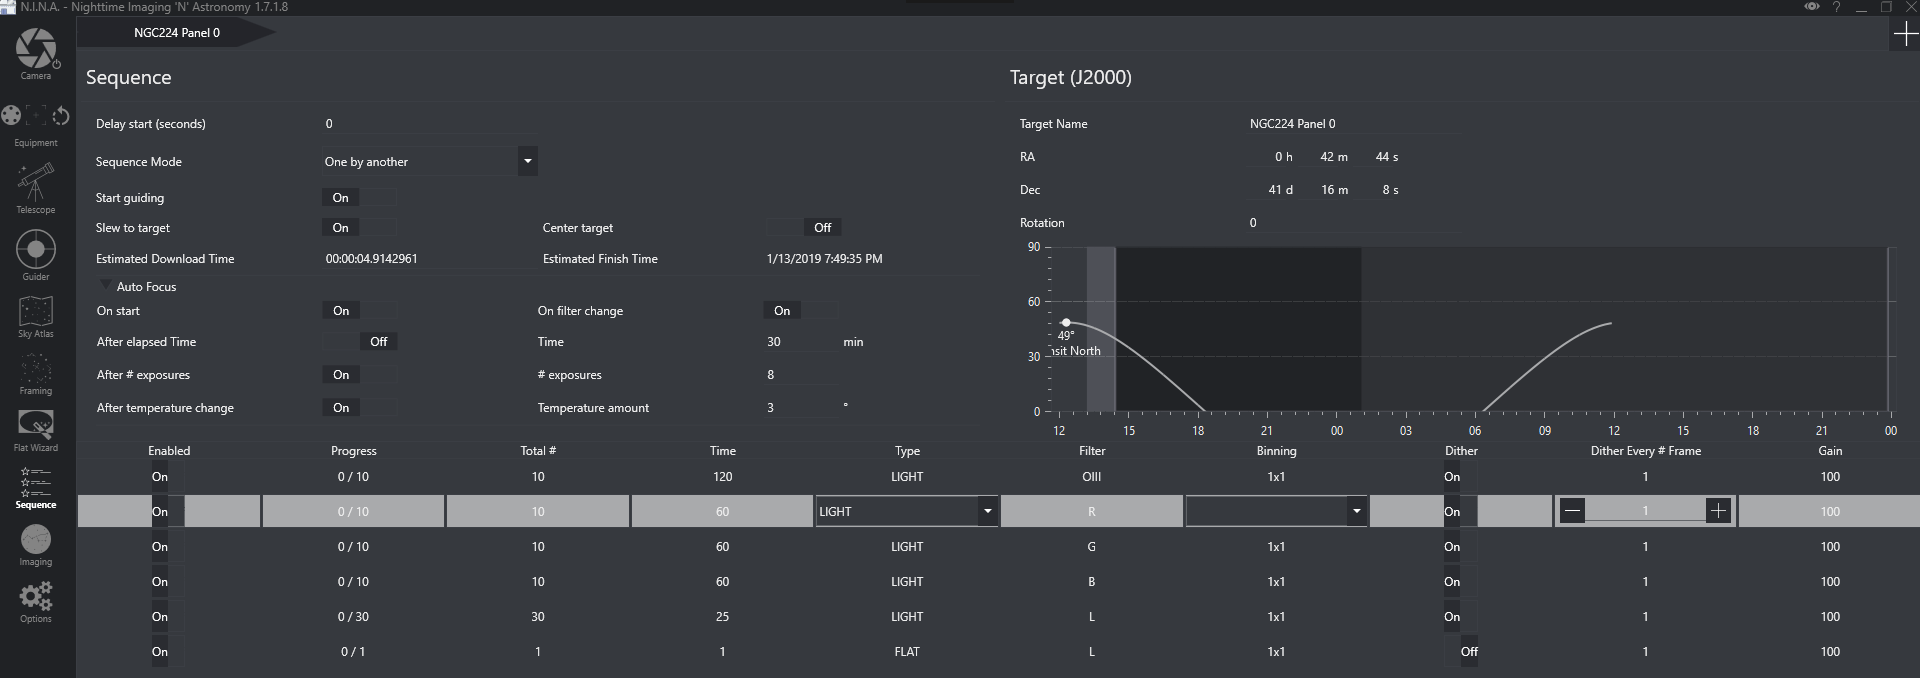
- Sequence Editor: Here is where you compose the sequence of exposures you want, with options to set filter types, dither between shots, and auto-focus based on a variety of parameters (temperature change, number of exposures, filter changes). It will also categorize your exposures into Lights, Darks, Bias and other types of frames.
- Flat Wizard: Flat frames are essential to astrophotographers in order to remove noise and other unwanted artifacts from the end-product. Flat Wizard makes producing accurate Flat Field exposures as well as Darks easy to do and removes the burden of figuring that out manually.
- Auto-focusing: Tools and actions to do automatic focusing at set points or after certain conditions, plus a wizard to help on pick good focusing targets
- Synchronized Dithering: Multiple instances of NINA may work together with a single instance of PHD2 to accomplish synchronized dithering.
- Plate Solving: Use one of several plate-solving software packages to plate-solve images for accurate telescope positioning and camera rotation needs. NINA’s polar alignment wizard also uses plate solving to allow you to accurately polar-align your mount. Astrometry.net, Platesolve2, and All Sky Plate Solver are supported.
There are of course a lot of additional small features, but there you have the core of what NINA can do. Other features such as the customizable UI elements, Bahtinov focusing, image statistics and analysis and more are all covered in the documentation.
Installation
NINA is a single download with up to two optional ones: The Sky Altas data which is a hair under 1GB in size, as well as your choice of plate-solving software (see links above.) It is my recommendation that both of these be installed and configured, as not doing so will prevent you from using some great features.
To begin, download NINA: https://nighttime-imaging.eu/download/
NINA is offered in both 32 and 64bit flavors. The files with -x86 in the name are the 32bit versions. Which one you use is important, as some native camera or ASCOM drivers supplied for various mounts, filter wheels, cameras and other items are still provided in only 32bit versions.
A word on NINA versioning: NINA follows an alternating Stable (release) and Unstable (development) release cycle. Even secondary version numbers are Stable, and odd ones denote Unstable. Hence, 1.6.x is Stable, where 1.7.x is Unstable. Version 1.8.0 will be the start of the next Stable series. Unstable versions are generally safe to use – they won’t turn your computer into a brick or anything – but they do tend to contain features that are experimental, not complete, or may have bugs that can create a confusing situation. Care is still taken by the developers to ensure stability, however, although nothing is guaranteed. Users of Unstable lines are especially encouraged to report bugs regarding any problems found.
Second, download the Sky Atlas data here:
https://www.dropbox.com/s/lgjoipj1q22fds5/SkyAtlasImageRepository.zip?dl=0
You may uncompress this zip file to anywhere you want on your system, and the uncompressed size of the data is just under 1GB. Once you install NINA, you must go to Options ? General and input the path to where you put this data in the Sky Altas Image Directory field. I put it in my Documents folder.
Third, choose and download a plate-solving suite if you do not have one of the supported ones installed already. I personally use Astrometry.net, however any the other supported suites work just as well. After you choose and install one, you may configure it in NINA under Options ? Plate Solving. Be aware that the plate-solving software itself may require additional data downloads of its own. Please refer to its documentation regarding this and other configuration aspects that are specific to it.
Installing NINA is straight-forward and familiar. There are no options to click or choices to make at the time of installation beyond the preferred installation location.
Getting Started
As a rule, the NINA documentation will always contain up to date step-by step instructions on configuring NINA once you have it installed. The first things you’ll want to do is configure the desired app-wide options under Settings. You will then want to connect and configure your hardware and verify that it’s functional through the app. For filter wheel users, do note that once you connect your ASCOM-enabled filter wheel, you will want to go to Settings ? Equipment and press the Import Filters from Filterwheel button. If you have filter slot names configured in your filter wheel’s ASCOM driver, this will import them into NINA and they will be visible wherever filters are used in the app. If you change the names of the filter wheel slots in the future, you will need to re-import them again.

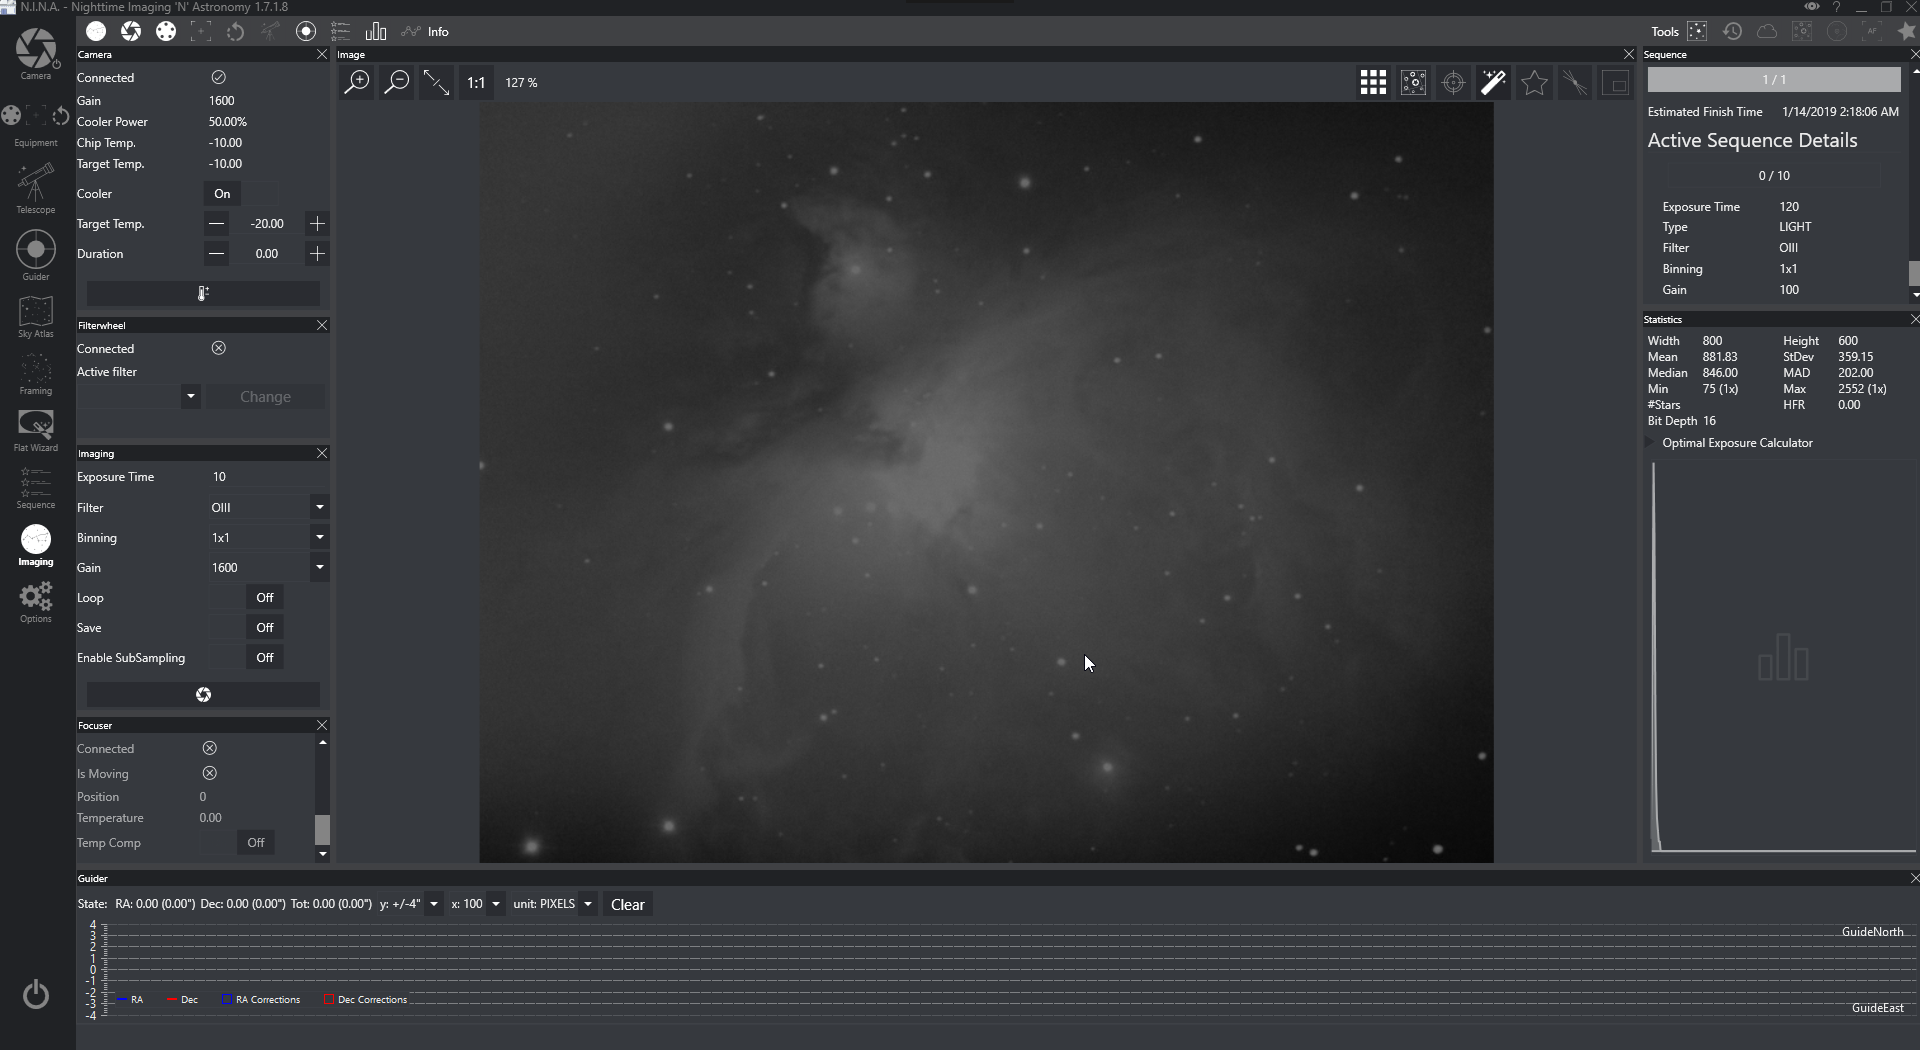
A quick test of things can be done in the Imaging pane. Here you will find a list of mini-window types along the top. Clicking one will spawn the associated mini-window which allows you to dock or stack these windows around the sides of the Imaging pane as desired. Camera control, PHD2 stats, the actual image, image stats and more are available.
Once you’ve verified that your camera, filter wheel, focuser and rotator (if you are lucky to have motorized ones!) work, you’re ready to start composing your first sequence. Explore using the Sky Atlas to specify your desired target and send it to the Framing Assistant for fine-tuning. Then send it to the Sequence editor and start filling in actions. Hopefully you’ll find NINA to be easy to use with advanced features which are accessible for the new astrophotographer.
Contributing
One thing to remember is that NINA is an opensource project, and its growth and development depends on interested people who contribute to it – bug analysis, documentation, UI design, and of course code itself. Anyone is welcome to contribute in any way they are able, and certainly knowing how to code is not a hard requirement because there are many non-coding related aspects which need to be maintained. If you are interested in getting involved, it is suggest that you look over the existing open issues and join the NINA Discord chat server. Links to both are below.
Quick Links
Happy imaging!
will there be support for Lacerta MGEN?
Hi Marcus, we have an open issue for implementing support for Lacerta MGEN, but there is no publicly-available documentation from Lacerta on how to integrate it, and one of the developers would likely also need a unit to test with anyhow. It’s a possibility, though, but Lacerta would need to engage with the team for it to happen.
if you need help contacting them or more tech info, let me know.
clear skies!
Great, thanks Marcus. It turns out one of the developers has an existing relationship with Lacerta and will be getting in touch with them for technical resources.
Will there be support for ASCOM domes?
Hey George, thanks for the question. Dome support will come eventually. This early in the game that isn’t a focus at the moment because we want to get the sequencing matured, and especially since none of the current contributors actually have a dome to fully test with. Though, if someone were to take enough interest and has the resources to test their code, I don’t think it would be turned down.
Tim Long in the UK has just writen new code for the nexdome. I’ve been a alpha and now a beta tester and would be happy to assist you in adding this to your AWESOME program “NINA”. I’ve searched for 2 years and tried nearly all of them and all fall short. SGP was over all teh winner, but is to linear and dev’s are not interested in user input. NINA beats SGP and is not linear… It’s faster and more intuitive. I’ve yet to crack a manual to quite guide I just used it as if I had been for years. I am retired and can test code on the nexdome. I have several guys in my nexdome group that would be thrilled to use NINA with their domes.
We’re in the 2nd beta and I suspect the release is near surely by the end of August. As is – now with NINA I have been running SGP in the background with only mount/dome connected. I recently stopped that and now load POTH for mount and dome. It does work okay, but I don’t like using seperate programs. Since it does work – I’m more interested in seeing RGB and stretch sliders to adjust subs visually. (on screen only). Of course many I’ve told about NINA first ask – can it live stack.
You have the best UI and nina is STABLE compared to others. I’m using 1.9 beta – THANK YOU. Donation to come!
I keep seeing references to poliar alignment with NINA, but I can’t find anything about it in the documentation. Is there a polar alignment aid like the one in Sharpcap?
Thanks.
Please, add SBIG native drivers support for this software.
Thank you.
Hi,
great product, and open source as well. I wanted to know if there was any plan to integrate indigo, so that the use of ‘remote’ raspberry observatories becomes possible?
cheers
Terry
Hello Sir.
I�m very excited to start using N.I.N.A. I really think I�ve found the right program for me!
Your link to dowload the Sky Atlas data here:
https://www.dropbox.com/s/lgjoipj1q22fds5/SkyAtlasImageRepository.zip?dl=0
seems to give me folder with SkyStudioPro
I�ve tried searching on google, but I�m unsure where to find the Sky Atlas data.
Perhaps you would be so kind and direct me to the proper download.
Kind regards
Stop the press! I found it here https://nighttime-imaging.eu/download/ bottom of the page :-)