The ASCOM Canon Lens Controller from Astromechanics is a popular device for those who wish to combine a Canon EF/RF lens with an astro camera and control the lens focus mechanism like a traditional ASCOM focuser.
One of the features of this device and its ASCOM Focuser driver is that it can set the lens aperture to a selected focal ratio. In the official Astromechanics ASCOM driver, the desired focal ratio is selected in the driver’s setup window and the lens’ aperture is set when you subsequently connect to the driver in your imaging application. Certainly useful, but there are obvious issues if you wish to change the focal ratio during the course of an unattended, automated imaging session.
The ASCOM Focuser class does not define a driver property for application control of something such as lens aperture, so I’ve created a plugin and ASCOM driver combination that uses a standard ASCOM mechanism to solve this problem.
Enhanced ASCOM Lens Driver
I have created an alternative ASCOM Focuser driver for the Astromechanics focuser named Enhanced ASCOM Lens Driver. It outwardly looks very much the same as the official one from Astromechanics. The difference is that it utilizes a somewhat neglected (in my opinion) facility available to ASCOM drivers called Actions. Actions allow the driver developer to define any number of arbitrary action names with an optional string argument. When an app calls the driver’s Action() method with an action name, the driver can do whatever it needs to do to service that command, with the Action() method returning with an arbitrary string status. Actions allow an application to tell the driver to do something, perhaps with some parameters, and get information from it.
My Enhanced ASCOM Lens Driver implements four different actions that can be called via the driver’s Action() method:
GetApertureIndex– returns the lens model’slens.txtindex number of currently active apertureSetApertureIndex– takes an action parameter of a stringified integer aperture index number to set the lens toGetFocalRatioList– returns a colon-separated string of focal ratios that are available for the configured lens model (example:f/2.8:f/3.5:f/4.0:�)GetLensModel– returns the name of the lens that is currently selected
All of these actions are listed in the driver’s SupportedActions property. Per the ASCOM specification, the actions may be called without regard to case sensitivity.
Astromechanics Aperture Control plugin
Naturally, any app just can’t start magically using driver actions with any purpose because it’s a portal to a completely arbitrary system, so the app must know specifically about them and how they work. This is where NINA’s plugin system and my Astromechanics Aperture Control plugin come in.
Astromechanics Aperture Control knows how to utilize these specific driver actions and makes them accessible for the NINA user. This way, you can change the focal ratio of the lens without having to disconnect the driver, set the desired focal ratio, and reconnect NINA to it. Instead, it can be done interactively in NINA by two ways:
- A control tool window in NINA’s Imaging screen
- An Advanced Sequencer instruction, Lens Focal Ratio, found under the Astromechanics Lens Controller category.
Both are very simple. You are presented with a drop-down box that contains the focal ratios that are available for the lens you have configured in the driver. Selecting one will cause the Astromechanics focuser set the lens’s iris to it. It’s very simple, but this simplicity hides the complex machinery that makes this possible.
Installation
Installation of this system involves installing the Enhanced ASCOM Lens driver and the Astromechanics Aperture Control plugin in NINA.
- Install the Enhanced ASCOM Lens driver by downloading it from here. Run the installer and you’ll find that it looks and installs like any ordinary ASCOM driver.
- In NINA’s Plugins tab, locate the Astromechanics Aperture Control plugin under the Available sub-tab and install it. Restart NINA to activate it.
Now that both major components are installed, configure the Enhanced ASCOM Lens driver to connect to your Astromechanics focuser.
Configuration
- In NINA, go to Equipment > Focuser and select Enhanced ASCOM Lens Driver (Focuser 1) from the device selection list. Like the official Astromechanics ASCOM driver, two copies of the Enhanced driver are installed in the event that you operate two of these devices on the same computer.
- Click the
 icon to open the driver’s configuration window. Choose the COM port that the Astromechanics focuser would be found on, as well as the lens model and the default focal ratio you desire. These settings can mirror the ones you might already have configured in any existing installation of the official Astromechanics driver.
 - Connect to the focuser by pressing the
 button. You might hear the iris in your lens actuate shortly afterwards as the driver sets the default focal ratio that you selected in the previous step.
Using the plugin
The Imaging screen
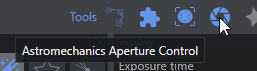
To control the lens focal ratio interactively, you can open the Astromechanics Aperture Control dockable window on the Imaging screen. It can be turned on by pressing the iris button in the Tools section in the upper right area of the Imaging screen.
This will give you a dockable window that shows the name of the configured lens and a selection box for the focal ratio.

The Sequencer instruction

You can change the focal ratio during the course of a sequence by using the Lens Focal Ratio sequence instruction. The operation of it is straight-forward: drop the instruction into the desired location in your Advanced Sequencer and select the focal length that you wish the lens to be set to when the instruction is ran.
Hi Dale. Using your updated ASCOM driver and NINA plugin. With the new driver the operation of the lens via the Astromechanik desktop app is fine. In NINA 2.2 the connection is OK and the equipment screen allows operation of the lens. But in the imaging screen the lens type and F-stop number are not populated. I’ve provided screen info and NINA log in the Discord plugin discussion section. Cheers, Gert.
You must install and use the Enhanced ASCOM Lens driver, discussed and linked above on this page.
Same issue as Gert and Enhanced ASCOM Lens driver has been installed. NINA version 3.2 Nightly #23
Hello, Dale,
Love your AstroMechanics Lens Plugin. Could you add a focuser moving range limitation to it?
Using my configuration as an example, with the Sigma 105mm lens, the stop limit for the controllable range is 0-8800. If the focuser moves beyond 8800, the whole focuser control will be confused during autofocus runs.
It would be nice to add the start and stop limits to define the range of the focuser that could be moved.
Thanks!
-Min
Will this work with lenses other than Canon?
Other than lenses connected to Canon cameras is what I meant :)